MongoDB를 Replica Set 형태로 배포할 때 DB URL에 TLS로 접근할 수 있도록 하려고 합니다.
다음은 MongoDB Replica Set을 만들때 사용하는 config파일의 tls 설정부분입니다.
1
2
3
4
5
6
7
net:
  port: xxxx
  bindIp: 0.0.0.0
  tls:
    mode: requireTLS
    certificateKeyFile: /data/mongo.pem
    CAFile: /data/fullca.pem
이 부분에 사용할 mongo.pem파일과 fullca.pem파일을 만들어보겠습니다.
certificateKeyFile 만들기
cerbot으로 도메인에 대한 인증서 발급받은 후 생성되는 파일 4개를 확인
certbot으로 도메인에 대한 인증서를 발급받으면
cert.pem,chain.pem,fullchain.pem,privkey.pem4개의 파일이 생성됩니다.privkey.pemprivate key 를 가지고 있습니다.
cert.pem- cert 1
- Issuer: C = US, O = Let’s Encrypt, CN = R3
- Subject: CN =
- cert 1
chain.pem- cert 2
- Issuer: C = US, O = Internet Security Research Group, CN = ISRG Root X1
- Subject: C = US, O = Let’s Encrypt, CN = R3
- cert 3
- Issuer: O = Digital Signature Trust Co., CN = DST Root CA X3
- Subject: C = US, O = Internet Security Research Group, CN = ISRG Root X1
- cert 2
fullchain.pemcert.pem, chain.pem 두 파일을 합쳐놓은 파일입니다.
fullca.pem만들기도메인에서 RootCA까지의 chain을 모두 저장하는
fullca.pem이라는 파일을 먼저 만들겠습니다.DST Root CA X3를 사용할 때에는
fullchain.pem에 “self-signed” DST Root CA X3 인증서를 추가하여 인증 chain을 완성해서fullca.pem을 만들었습니다.1 2 3 4 5 6 7 8
#!/bin/bash here=$(cd "$(dirname "$(readlink -f "$0")")"; pwd) wherekeys=/etc/letsencrypt/live/<domain_URL> wget --directory-prefix="$here/../" http://apps.identrust.com/roots/dstrootcax3.p7c openssl pkcs7 -inform der -in "$here/../dstrootcax3.p7c" -out "$here/../dstrootcax3.pem" -print_certs cp "$wherekeys/fullchain.pem" "$here/../fullca.pem" cat "$here/../dstrootcax3.pem" >> "$here/../fullca.pem" cat "$wherekeys/privkey.pem" "$here/../fullca.pem" > "$here/../mongo.pem"
하지만 2021-09-30에 Let’s encrypt에서 DST Root CA X3 사용이 중지됨에 따라 기존 방법으로는 인증이 되지 않았습니다.
Let’s Encrypt의 DST Root CA X3 만료
그래서
cert.pem+chain.pem의 cert 2 +isrgrootx1.pem(self-signed ISRG Root X1 인증서) 를 통해fullca.pem을 만들었습니다. (self-signed ISRG Root X1 인증서는 https://letsencrypt.org/certificates/ 의.pem파일을 이용하였습니다.)1 2 3 4 5 6 7 8 9 10 11
#!/bin/bash here=$(cd "$(dirname "$(readlink -f "$0")")"; pwd) wherekeys=/etc/letsencrypt/live/<domain_URL> wget -O "$here/../isrgrootx1.pem" https://letsencrypt.org/certs/isrgrootx1.pem cp "$wherekeys/cert.pem" "$here/../fullca.pem" csplit -s -z -f "$here/../chain-" "$wherekeys/chain.pem" "/-----BEGIN CERTIFICATE-----/" "{*}" cat "$here/../chain-00" >> "$here/../fullca.pem" cat "$here/../isrgrootx1.pem" >> "$here/../fullca.pem" cat "$wherekeys/privkey.pem" "$here/../fullca.pem" > "$here/../mongo.pem" rm $here/../chain-*
: 4개의 파일로
mongo.pem를 생성하는 스크립트입니다.fullca.pem이 잘 생성되었는지 확인해보기생성된
fullca.pem을 통해서cert.pem이 인증되는 것을 확인할 수 있습니다.
1 2
openssl verify -CAfile fullca.pem cert.pem -> cert.pem: OKmongo.pem만들기privkey.pem을fullca.pem에 더해mongo.pem을 만듭니다.
이제 생성한 fullca.pem파일과 mongo.pem파일을 config파일에서 명시한 위치에 옮겨서 Replica Set을 만드는데 사용할 수 있습니다.
+ 참고
인증서 갱신
certbot을 통해 인증서를 발급받으면 기본적으로 crontab을 이용해 매일 2번 renew가 실행되며, 만기일이 30일보다 적게 남은 인증서가 업데이트됩니다.
인증서 확인하기
openssl x509 -text -noout -in cert.pemcert.pem파일의 Validity, Issuer, Subject 등의 정보를 확인할 수 있습니다.
openssl verify -CAfile fullca.pem cert.pemCAfile의 Chain of trust로 인증서를 인증할 수 있는지 확인할 수 있습니다.
openssl s_client -connect <Domain URL> 2> /dev/null | openssl x509 -noout -dates도메인의 URL로부터 인증서 만기일을 확인할 수 있습니다.
sudo openssl x509 -dates -noout -in /etc/letsencrypt/live/<Domain URL>/fullchain.pem.pem파일로부터 인증서 만기일을 확인할 수 있습니다.
- 참고자료
MongoDB Shell에서 TLS상태 확인하기
db.serverStatus()로 확인할 수 있습니다.
security.SSLServerHasCertificateAuthorityfalse인 경우 CA파일이 제대로 읽어지지 않은 것이므로 Root CA를 포함한 CA chain파일을 넣어주면 됩니다.
security.SSLServerCertificateExpirationDate인증서의 만기일을 확인할 수 있습니다.
인증서 생성(manual)
- dns plugin을 제공하지 않는 곳에서는
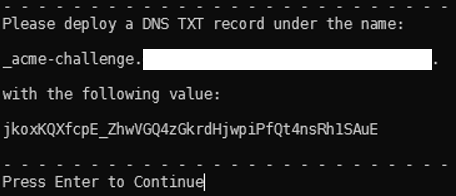
--manual옵션으로 인증서를 생성해야 합니다.certbot certonly --manual --preferred-challenges dns --cert-name CERT-NAME -d DOMAINS
요청된 값을 TXT record에 추가하면 됩니다.
![manual1]()
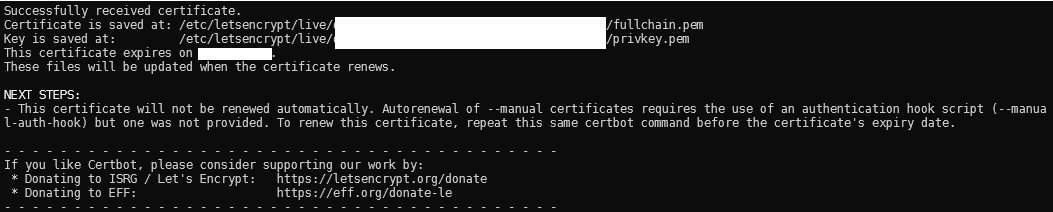
정상적으로 등록이 되었다면 아래와 같은 메시지를 확인할 수 있습니다.
![manual2]()
- 메시지 내용처럼
--manual로 생성한 인증서는 자동으로 renew되지 않습니다.